OneDrive for Business Auto Registration - Old School
So this is something I wrote quite some time ago, many folks configure OneDrive using the Administrative Templates in Intune, but old habits Die Hard. Below you will learn how to build a One Drive Profile to Auto Configure OneDrive under the current Logged on user using a Custom CSP and ADMX ingestion, very slick Process.
One Drive is quickly growing as many of my customers are adopt Office 365 and a great tool for individual business continuity, we can allow one drive to automatically configure and start backing up Desktop, Documents, and Pictures. This will also bring forward any items that have been previously backup to OneDrive.
Gather the Contents of the OneDrive.admx
-
Find the OneDrive ADMX template in the source folders for this module or on a Windows 10 client in the following location %LocalAppData%\Microsoft\OneDrive\ in the current client version folder > ADM > OneDrive.admx
or from my Github - Client/OneDriveADMX.txt at master · Mauvlans/Client · GitHub
-
Right click the OneDrive.admx open with Notepad
-
Copy the entire contents and save for later.
Gather the Directory ID
-
Sign into Azure Active Directory
-
Under the Manage Blade Select Properties
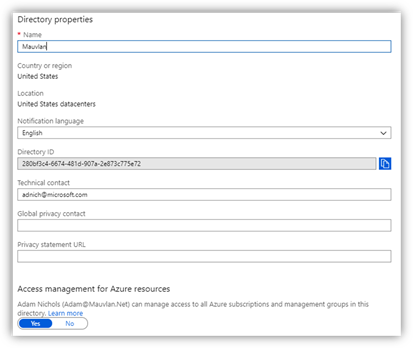
Copy the Directory ID: XXXXXXXX-XXXX-XXXX-XXXX-XXXXXXXXXXXX
Build Custom OMA-URI Policy
-
In Intune, choose Device Configuration > Profiles.
-
Select Create Profile.
-
Enter a Policy Name ex. AP – OneDrive Policies
-
Enter Description as needed.
-
Select Platform: Windows 10 and later
-
Select Profile Type: Custom
-
Select Settings Configure
-
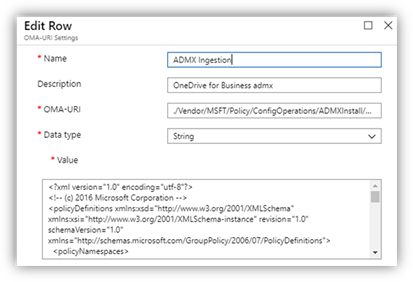
Select Add and enter the following
Name: ADMX Ingestion
Description: OneDrive for Business admx
OMA-URI: ./Vendor/MSFT/Policy/ConfigOperations/ADMXInstall/OneDriveNGSC/Policy/OneDriveAdmx
Data type: String
Value: Original content of the OneDrive admx file from steps 1-2 above.
-
Click OK
-
Click Add
-
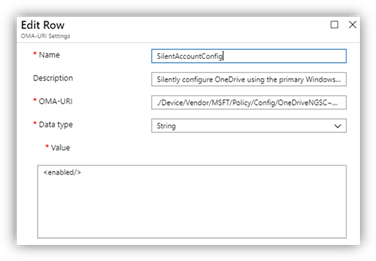
Select Add and enter the following
Name: SilentAccountConfig
Description: Silently configure OneDrive using the primary Windows account
OMA-URI: ./Device/Vendor/MSFT/Policy/Config/OneDriveNGSCPolicyOneDriveNGSC/SilentAccountConfig
Data type: String
Value:
-
Click OK
-
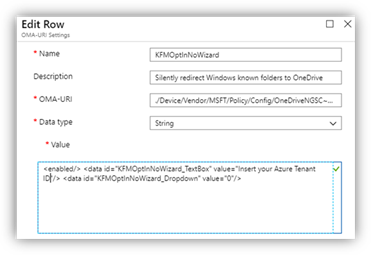
Select Add and enter the following
Name: KFMOptInNoWizard
Description: Silently redirect Windows known folders to OneDrive
OMA-URI: ./Device/Vendor/MSFT/Policy/Config/OneDriveNGSCPolicyOneDriveNGSC/KFMOptInNoWizard
Data type: String
Value:
Click OK
- Select Add and enter the following
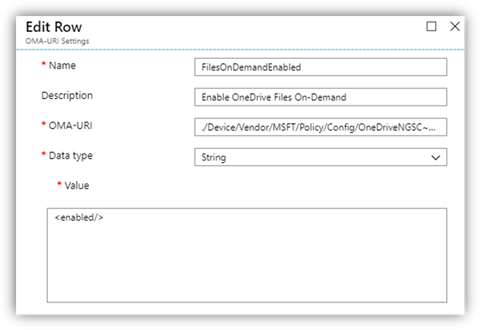
Name: FilesOnDemandEnabled
Description: Enable OneDrive Files On-Demand
OMA-URI: ./Device/Vendor/MSFT/Policy/Config/OneDriveNGSCPolicyOneDriveNGSC/FilesOnDemandEnabled
Data type: String
Value:
-
Click OK
-
Click OK
-
Click Create
-
Click Assignment
-
Select Pilot Group targeting Pilot Users
-
Save and Close